

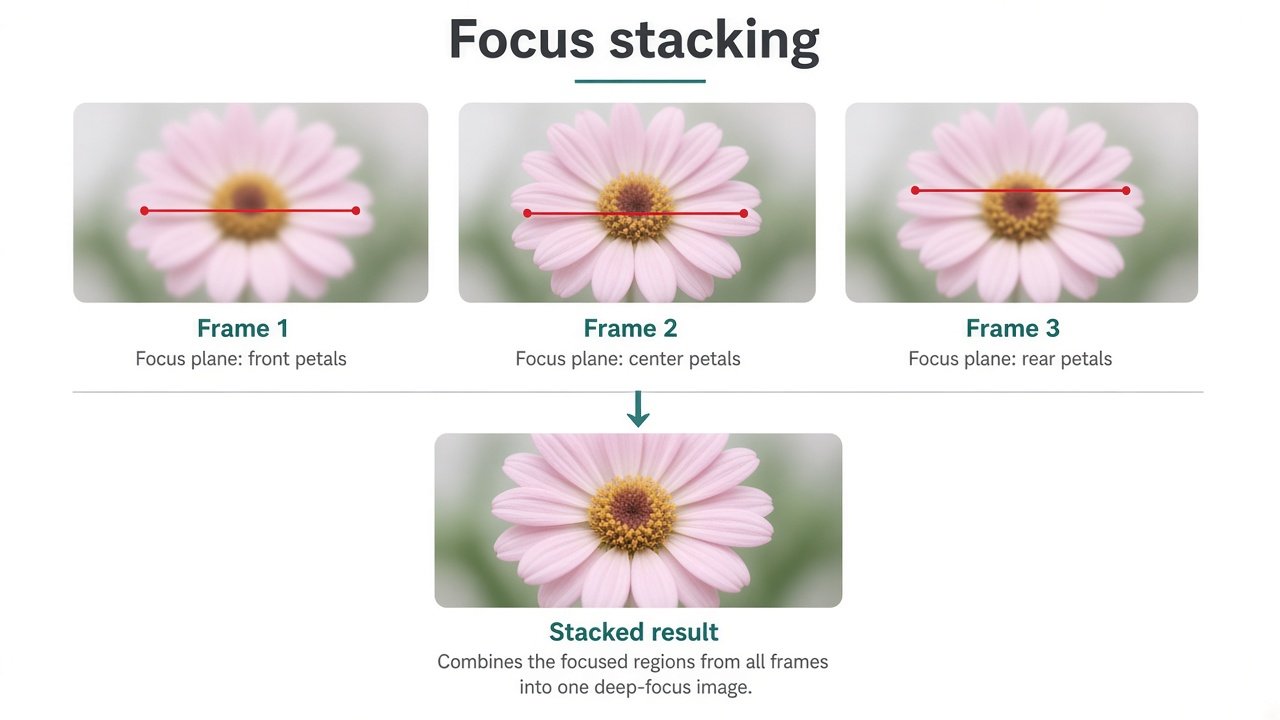
Focus stacking macro photography is the practical answer when a single frame cannot hold the whole subject sharp. At high magnification, depth of field shrinks to a sliver—often thinner than an insect’s eye or a watch pivot. Stopping down helps only so far before diffraction softens the file. Stacking fixes that trade-off: you shoot a sequence of focus planes, then blend the sharpest parts into one image that looks optically impossible in a single exposure.
This field guide covers why macro depth of field collapses, how to choose an aperture for stacking, how to shoot clean increments on a tripod or focus rail, and how Helicon, Zerene, and Photoshop handle the blend. If you still need vocabulary for magnification, working distance, and diffraction, start with our macro photography terms explained primer, then come back here for the stacking workflow.
Why macro DOF collapses so fast
Depth of field depends on aperture, focal length, subject distance, and sensor size. In macro work, subject distance is the killer: once you approach 1:1 or beyond, the focused slice becomes extremely thin even at f/8 or f/11. Double the magnification and the usable depth roughly halves again. That is why a flower center can look perfect while the petal tip and the stigma fall off in the same frame.
At 2x, the problem is obvious on any modern high-resolution body. Lenses such as the Laowa 100mm f/2.8 2x Ultra Macro APO, the Laowa 90mm f/2.8 2x Ultra Macro APO, and the APS-C Laowa 65mm f/2.8 2x Ultra Macro APO are sharp enough to reveal every plane you miss. The more resolution you have, the more you notice that single-shot DOF is not enough for a fully crisp specimen.
Beyond about 5x–10x, stacking stops being optional for most commercial or scientific stills. Modular high-magnification systems (including the Laowa Aurogon FF 10-50X NA0.5 Supermicro APO) push the camera into a world where a single plane might cover only a fraction of a millimeter. You either accept a soft front-to-back look or you build a stack.
Aperture choice: sharpness vs diffraction
Before you decide how many frames to shoot, pick an aperture that balances micro-contrast against diffraction. Wide open (f/2.8–f/4 on many macros) maximizes light and background blur, but optical aberrations and extremely thin DOF make stacking harder: you need finer steps and more frames. Stopped way down (f/16–f/22) thickens each slice and shortens the stack, yet diffraction turns fine hair and scale texture into mush—especially on high-megapixel sensors.
For most macro depth of field stacking on full frame, a working aperture around f/5.6 to f/8 is the sweet spot: good lens performance, manageable step size, and diffraction that has not yet dominated. On APS-C or Micro Four Thirds, lean a stop brighter (often f/4–f/5.6) because the smaller sensor amplifies diffraction sooner for the same f-number. At extreme magnification, some shooters still use f/8 as a mechanical stop while accepting that the software stack, not the iris, will deliver total depth.
Think of aperture as how thick each “slice” is, not as a substitute for stacking. Diffraction vs aperture in macro is a negotiation: open enough to stay sharp, closed enough that your step size stays practical in the field.
Shooting a clean stack: tripod, light, increments
Learning how to focus stack macro subjects starts with stability. Any shift between frames becomes a ghost or a jagged edge in the blend.
- Lock the camera. Use a stout tripod, a low center column, and mirror-up or electronic shutter if your body offers it. Disable IBIS/OS when locked down so the sensor does not “hunt” between frames.
- Light for consistency. Continuous LED or flash with a fixed power setting beats mixed ambient that changes as clouds move. Keep the light angle fixed for the whole sequence.
- Choose a step method. Manual focus ring clicks, focus bracketing in-camera, or a dedicated focus rail macro setup all work. Rails shine at high magnification because they move the camera in known micron/millimeter increments instead of guessing ring travel.
- Overlap planes. Each frame should keep some sharpness that the previous frame already covered. Too-large steps leave soft bands; too-small steps waste time and invite subject motion.
- Bracket the subject. Start slightly in front of the nearest important surface and finish slightly behind the farthest. Cropping a soft tip in post is harder than overshooting by two frames.
Rule-of-thumb step size shrinks with magnification. Near 1:1, tenths of a millimeter may suffice. Near 2x, think smaller. At 5x–10x, electronic rails and automated controllers become the sane path.

Field vs studio stacking workflows
Field stacking prioritizes speed and wind management. Photograph live insects or flowers early when air is still, or shield the subject with a foldable reflector and your body. Use flash to freeze tiny motion; keep bursts short (often 8–30 frames) so the subject does not wander. Handheld stacking is possible with practice and fast shutter speeds, but a mini tripod or clamp usually doubles your keeper rate. Tele-ish macros like the 90mm and 100mm 2x options give more working distance outdoors, which helps lighting and reduces spooking skittish subjects.
Studio stacking prioritizes control. Mount the camera on a focus rail, fix the subject on a stage, and use continuous or strobe light with flags. You can shoot 50–200+ frames without guilt when the subject is a coin, circuit, or pinned specimen. High-magnification kits—including the Laowa Aurogon FF 10-50X NA0.5 Supermicro APO—belong here: vibration isolation, remote release, and consistent illumination matter more than hiking weight.
APS-C bodies paired with the 65mm 2x Ultra Macro APO make a compact field kit; full-frame 90mm/100mm 2x lenses cover both outdoor insects and tabletop product work. Match the lens to the magnification you actually need, then decide whether the day’s stack is “enough sharpness before the bee leaves” or “every micron of a static subject.”
Software blending basics and common artifacts
Three tools dominate the Helicon Zerene Photoshop stack conversation:
- Helicon Focus — fast, with methods tuned for different subject types; strong retouching workspace for cloning from source frames.
- Zerene Stacker — excellent depth maps and retouching; a favorite for insects and scientific work where fine hairs matter.
- Photoshop — Auto-Blend Layers (Stack Images) is convenient if the stack already lives in your Adobe workflow; finesse often needs manual masking on hard cases.
Typical pipeline: align frames → blend → retouch halos → color/contrast. Expect artifacts. Halos appear around high-contrast edges when depth maps misread which frame is sharpest. Soft bands mean your step size was too large. Ghosting means the subject or camera moved—fix-shoot or clone from a clean frame. Dust on the sensor becomes a marching army across a stack; clean the sensor before a long studio session.
Export a full-resolution master, then sharpen gently for the web. Over-sharpening stacked macros creates crunchy edges that scream “processed.”
When a single sharp frame is still better
Stacking is a tool, not a religion. Skip it when:
- The subject is moving faster than you can complete a sequence (active insects in breeze).
- You want a storyteller’s look: sharp eye, soft body, dreamy background—classic single-plane macro.
- Deadlines demand one frame now, and f/11 already holds the brief.
- You are shooting video or a focus pull; stack software does not replace motion focus.
Many strong portfolio images are intentionally shallow. Use stacking when the brief asks for edge-to-edge specimen clarity—catalog work, textures, educational plates, or “see every scale” hero shots. Use a single frame when mood and selective focus are the point.
FAQ
What is focus stacking in macro photography?
Focus stacking in macro photography means capturing multiple images of the same subject with the focus plane shifted slightly between frames, then blending those frames so the sharp regions combine into one deep-focus photo. It overcomes the razor-thin depth of field that appears at high magnification without forcing you into diffraction-heavy apertures.
How many photos do I need for a macro stack?
It depends on magnification, aperture, and subject depth. A shallow flower at 1:1 and f/8 might need fewer than 10 frames. A 2x insect head-on might need 20–60. Extreme close-ups at 5x–10x can run into hundreds. Start with generous overlap; after a few sessions you will recognize when soft gaps appear and tighten the step size.
What aperture should I use when focus stacking?
Most photographers stack around f/5.6–f/8 on full frame (often one stop brighter on crop sensors) to balance lens sharpness against diffraction. Wider apertures need finer steps; smaller apertures shorten the stack but soften fine detail. Treat aperture as slice thickness, and let the stack—not f/22—create total depth.
Do I need a focus rail for macro stacking?
No for mild 1:1 work: careful focus-ring moves or in-camera focus bracketing can be enough. Yes as magnification climbs or when you need repeatable micron-level steps—especially in studio or with high-magnification systems. A focus rail macro setup reduces guesswork and improves alignment for software blending.
Master the basics—stable support, sensible aperture, overlapping steps, and patient retouching—and focus stacking becomes routine instead of mysterious. Pair that workflow with optics that already resolve well at 2x, and you will spend less time fighting soft frames and more time choosing which details deserve to stay sharp.


Leave A Comment